Now Live: Website Software Update

Your library website (kcls.org) upgraded to a new software version on April 3. This update is focused heavily on the backend tools that power our website and will not bring many changes to your experience using the site. Here's what to expect.

What has stayed the same?

  • The entire catalog. This includes Search, My Account/Borrowing, Suggest for Purchase, and every other catalog feature.
  • The search tool at the top of the website and catalog.
  • The online event calendar.
  • Menus at the top of the website and catalog, and menus/links at the bottom (‘the footer’) of the website and catalog.
  • Library Hours & Locations pages.
  • FAQs
  • Basic informational pages and forms like Interlibrary Loan and About Us.

What's different?

Book, movie, and music recommendations are easier to find. 

Browse all similar book, movie, music, and other recommendations using a new Explore tool.

For example, click ‘Featured,’ ‘View All,’ or any of the category links (such as 'Books' or 'All Nonfiction') from this section at the top of the Books page to view similar recommendations.

From this section at the top of the Books page, you can click ‘Featured,’ ‘View All’, or any of the taxonomy links at the bottom such as Books, or All Nonfiction to view all related content.

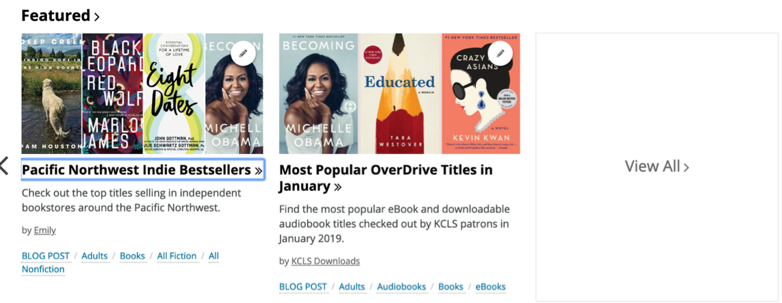
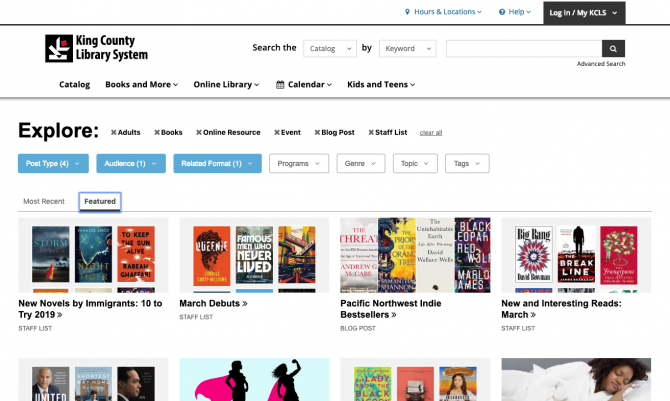
View results for related recommendations on a new Explore page. Browse only the recommendations you’re most interested in by adding or removing Post Type, Audience, Related Format, Program, Genre, Topic, or Tag filters.

Note that the Explore page is not a way to search the catalog or website. To search the catalog or website, use the search tool.

You can add or remove taxonomy filters from the drop-down category menus to browse featured website content by Post Type, Audience, Related Format, Program, Genre, Topic, or Tag with the new Explore tool.

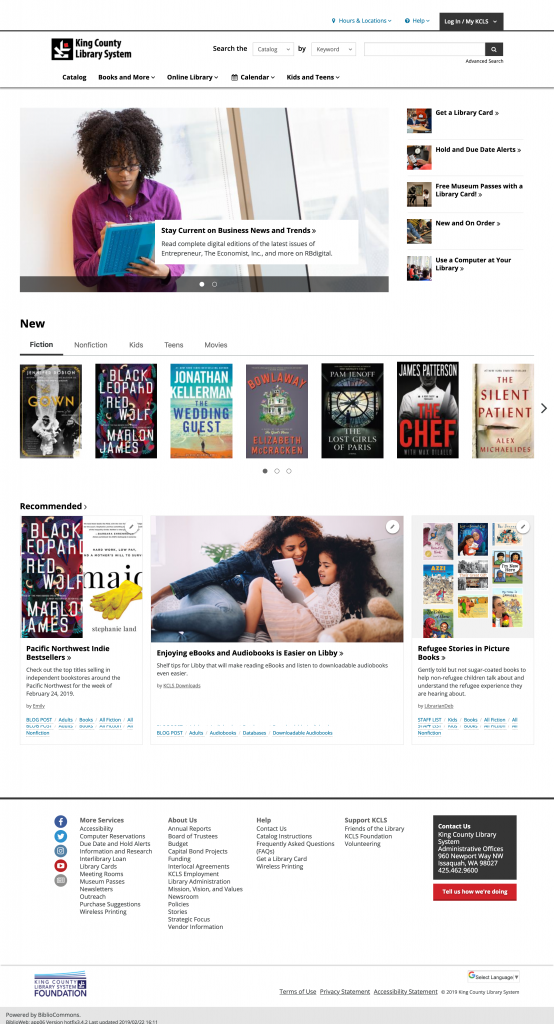
The homepage is simpler.

Get to information more easily on a streamlined page with less overall content.

Find frequently used information like museum passes faster in a new quick links section at the top right.

View select recommendations focusing on adults, kids and teens, and other services in a new 'Recommended' section at the bottom. 

The new version of the website works better for people with accessibility needs.

Our vendor Bibliocommons has designed, built, and tested this software upgrade with improved accessibility in mind. Patrons who make use of screen reader software, tabbed browsing, high contrast displays, magnification tools, and other assistive technologies should have a much better experience using the new KCLS website.

If you are a person with a disability and have trouble using our website or you use assistive technology and have difficulty accessing information on our website, contact our ADA Coordinator.

Questions about this change or need help using the new website?

Find answers to frequently asked questions about using the website.

  • There are several ways to send a document to a printer at the library.

    Mobile Phone or Tablet

    Personal Computer

    Email

    Public Computer

    Tips for Printing

    Mobile Phone or Tablet

    Print from your phone or tablet without the app.

    1. Go to our Print from Your Own Device page and choose your print location.
      Or, open
      print.princh.com in your browser.
      Or, scan the QR code located near the printer.
    2. Enter the printer ID located near the printer. (You can skip this step if you scanned the QR code or went to our Print from Your Own Device page.) 
    3. Upload your documents. 
    4. Choose your print settings. 
    5. Log in at the print release station with your library card. Use your print allowance. Or pay with your preferred payment method. 
    6. Take your print job from the printer. 

    Watch a video guide to printing on a phone or tablet without the app. 

    Follow our tips for printing.


    Print from your phone or tablet with the app.

    iOS 

    1. Install the Princh app for iOS.
    2. Open the document, click Share and then select the Print option.
    3. Pinch out on your document and click Share.
    4. Find the Princh app and select it.
    5. Enter the printer ID or scan a QR code (located near the printer).
    6. Choose your print settings.
    7. Use your print allowance. Or pay with your preferred payment method.
    8. Take your print job from the printer.

    Watch a video guide to printing in the iOS app.

    Follow our tips for printing.

    Android 

    1. Install the Princh app for Android.
    2. Open the document, click the three dots and then press Print.
    3. Select a printer and press Print.
    4. Enter the printer ID or scan a QR code (located near the printer).
    5. Choose your print settings.
    6. Use your print allowance. Or pay with your preferred payment method.
    7. Take your print job from the printer.

    Watch a video guide to printing in the Android app.

    Follow our tips for printing.


    Personal Computer

    Print from a personal laptop or computer. 

    1. Go to our Print from Your Own Device page and choose your print location.
      Or, open
      print.princh.com in your browser.
    2. Enter the printer ID located near the printer. (You can skip this step if you went to our Print from Your Own Device page.)
    3. Upload your documents.
    4. Choose your print settings.
    5. Log in at the print release station with your library card. Use your print allowance. Or pay with your preferred payment method.
    6. Take your print job from the printer.

    Watch a video guide to printing on a laptop. 

    Follow our tips for printing.


    Email

    Print from email on any device.

    1. Find the email address for the black and white or color printer at your library on this list. You will need to specify the name of the library and color option (color or black and white) in the address.
    2. Send your document to the printer's address.
    3. Log in at the print release station with your library card or the email address you used to send the request. Use your print allowance. Or pay with your preferred payment method.
    4. Take your print job from the printer.

    Documents sent to the printer by email are letter size and single-sided by default.


    Public Computer

    Print from a public computer.

    1. Open the document and press Print.
    2. Select a printer and press Print again.
    3. Choose your print settings.
    4. Log in at the print release station with your library card. Use your print allowance. Or pay with your preferred payment method.
    5. Take your print job from the printer.

    Watch a video guide to printing on a public computer.

    Follow our tips for printing.

    Tips for Printing

    Before you send any print request, use the print preview option in Princh or on your device. Check the number of pages.

    You can print up to $1.50 each week for free with your library card's weekly print allowance. That gives you up to 10 black and white or 3 color pages each week.

    You have the option to pay for more prints.

    If you're not at a library, make sure that the location you're sending the print request to is open for visits.

    The printer code is the same for all of the printers at your library.

    The printer email address is unique to the black and white or color printer at your library.

    Double-sided printing is not available in Princh. (The option to choose a paper size other than letter will be grayed out in the print settings menu.)

  • DIA celebra la literatura infantil, las familias, la lectura y la diversidad multicultural. 

    El Día del niño y del libro (también conocido como DÍA o Diversidad en acción) comenzó hace 28 años. Pat Mora, escritora mexicano-estadounidense introdujo esta celebración en los Estados Unidos en 1996. El Día del niño y del libro enfatiza la importancia de leer en el / los idiomas de la familia y preservar la/s cultura/s de origen a través de los libros. 

    ¡Gracias a nuestros socios! 

  • The reading challenge is part of our yearlong Celebrate the Freedom to Read campaign. Celebrate our freedom by collectively reading or listening to 1 million minutes. 

  • Book Group Kits are bags containing 10 copies of the same book that you can check out and use for your book clubs or other groups.

    1. Follow the link for Rosetta Stone on our Databases page in a browser. Enter your library card number and password.
    2. Select Rosetta Stone Library Solution from the list.
    3. Create an account with your email address and a password. Select a language to learn. You can only learn one language with the Rosetta Stone.
    4. On your mobile device, download the Rosetta Stone app from your provider’s store. You can follow the link in the “View available apps” section on our Databases
    5. Open the app and select “Log In” underneath the blue “Get Started” button.
    6. Select “Work or School” for the account type.
    7. Enter the email address you used to create your Rosetta Stone account for the user name. Enter the password you created. On Android devices, choose Next.
    8. Enter the Workspace ID on Apple devices and when prompted for Android device. The workspace ID is s9225476.
    9. Choose Sign In for iOS or Next for Android.
    10. Start learning!

Still need help? Call, email, or chat with us.

This post has been updated to reflect that the update is now live.